a texture tutorial
with the current expansions in 2025 petz, i have started playing around with textures more; with palettes and transparency, textures are even more useful than ever when it comes to making intricate patterns and details without gruelling over tiny 1px paintballs.
this tutorial comes in two parts - how i make my own textures that can be easily palette swapped, and how to make and use transparent textures. i am no texture messiah and my words are not gospel but this is just how i personally do texture-y things.
another note - transparency is still in beta, so is a little more ‘different strokes for different folks’, i’ve included some troubleshooting at the end but obviously it’s not all-encompassing. i will aim to keep this updated if there are any big changes etc.
13.08.25 - i have updated this tutorial with a much better way to make and index textures correctly, that has so far, given me no issues when it comes to textures and colours appearing properly in game. i will leave all of the old content up as most of it is still relevant, but have included an updated method in part 3 - please refer to this part when it comes to indexing textures correctly, no matter how you make your textures in the first place!
things you will need
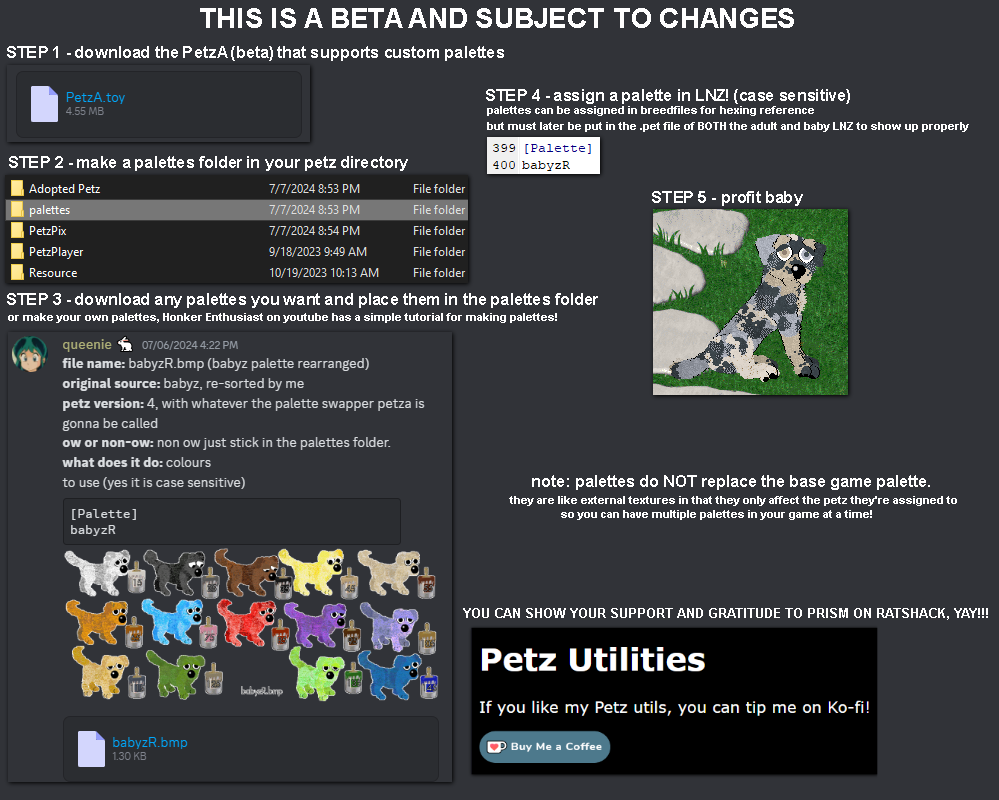
- prism’s petzA - the LATEST beta version, found in prism’s server here. go to the thread for the latest beta release and scroll to the bottom/the most recent post and find the most recent release from there. do not do what i did and just grab the first release in the thread like the idiot i am.
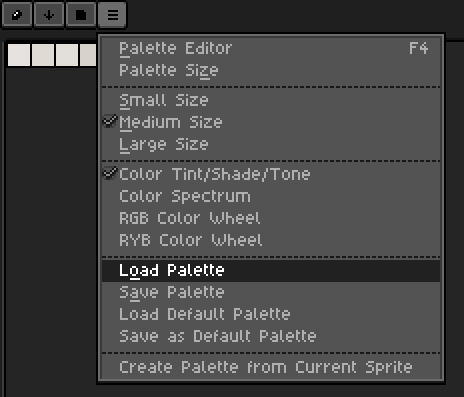
your petza should look like this:

obviously your settings will vary but these are the options you should have. the last three options on the right column (‘enable palette swaps’, ‘unlock palette’ and ‘enable transparency’ are important - we need those ticked for palettes and transparency! so make sure they’re on.)
- art software that supports layers and locking the opacity of layers. these are both are important for easily changing our colours between palettes. i personally use, and this tutorial is written with, paint tool sai 2, which you can totally not get for free here (this is the exact version i downloaded and it works great). it comes with a binary tool brush included which is essentially a pixel art brush, aka non-aliasing, which is very important too.
- libresprite - for exporting your textures as indexed bmps. no idea if this extra step does anything, but i do it for peace of mind.
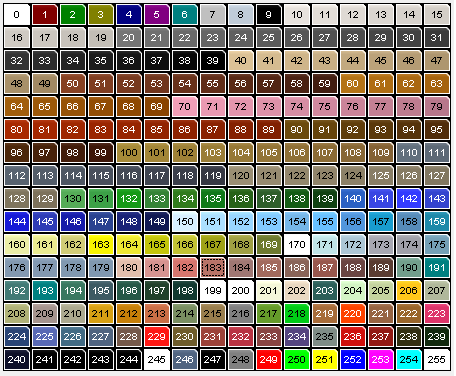
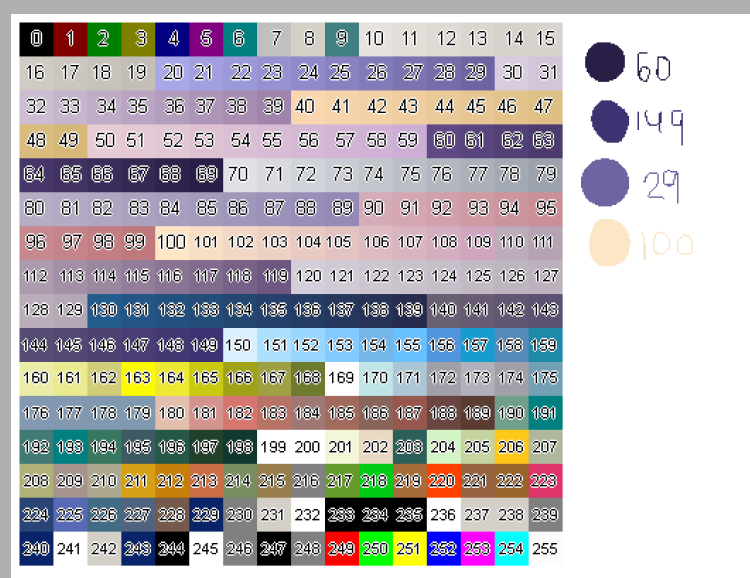
- an image of the petz palette, and an image of the palette you’re making your texture for. queenie’s database has them all - i simply take a screenshot of the full palette image and paste it onto a new canvas in paint tool sai. make sure you download and install the palette you want to use too! hash has made a guide which you can view here
here is an image of the default petz palette if you do not have it saved anywhere!
part one - setting up & making your own textures
open up your art program. for the sake of those new or unfamiliar with paint tool sai 2, i’ve included screenshots of how i have my sai set up below, and also the settings for the binary pen brush. i know art software is horrifying when you’re not familiar with it so consider this a ‘quick start’ guide.
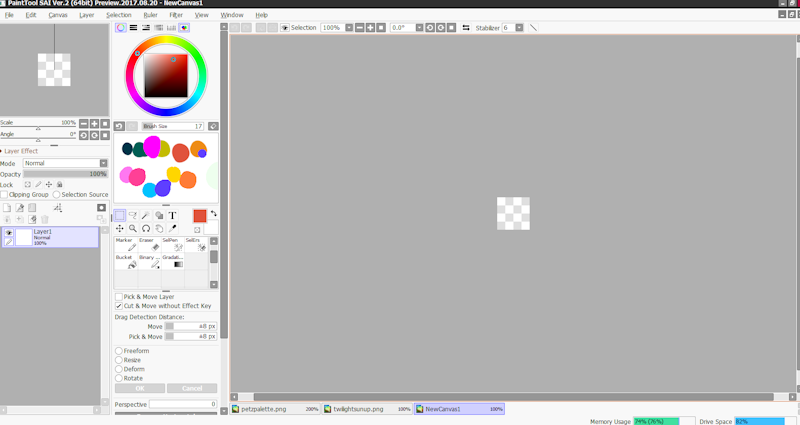
(the sidebars can be moved around - i moved mine so they’re both next to eachother on the left, but it does not matter where they are lmao)
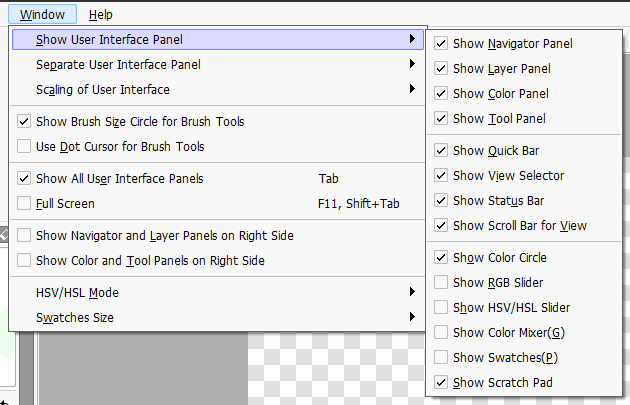
my window settings

binary pen settings! this makes it sharp and crispy, just how petz and it’s finicky indexing likes it
now load in the images of the petz palette, the palette you want to use, and a blank canvas for your texture. i use 64x64 with a transparent background for my blank canvas; most internal textures are 8x8, 16x16, 32x32, 64x64,128x128 or 256x256, so any of these are ‘safe’ bets, and the transparent background is just because it provides nice little 8x8 cubes in the background which i can use as a grid. for non-transparent textures, like the one i’m making here, it needs to be seamless and tilable, so a grid is really helpful!
your images will appear in seperate windows/tabs along the bottom, like so:

(i am using jem’s twilight-sun-up palette for this texture!)
now for a very important part - LAYERS! anyone who makes digital art will be familiar with layers. here is our layer toolbar in paint tool sai 2. highlighted are it’s most important features for this tutorial!
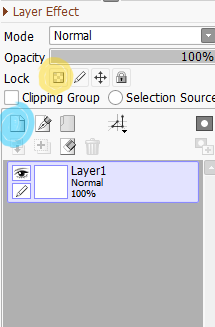
in blue we have the new layer button - this does what it says, adds a new blank layer to your image.
in yellow we have the ‘lock opacity’ button which becomes important later - this allows us to quickly change the colour of each layer.
NOW FOR SOMETHING IMPORTANT
for every new colour, you need a new layer. one colour per layer. pay close attention to which layer is selected and therefore which layer you are working on so you don’t have to redo a bunch of work! the selected layer in sai is highlighted in blue - in the above image, you can see that i am on layer 1.
NAME YOUR LAYERS. you can rename your layers in sai by double-clicking them and entering the name into the box that pops up. name your layers the palette number of the colour you used on that layer. for instance, if i have a layer where i used colour 40, i’ll name that layer 40. the actual colour (whether it's cream, or blue, or brown) does not matter - just the number/index it is on the palette.
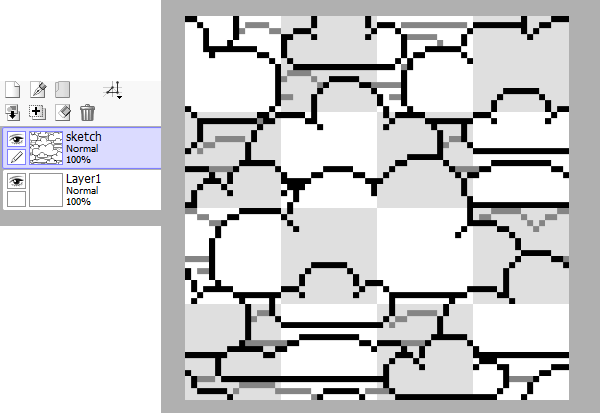
now for the fun part - drawing/making the texture. i fancy something cloudy, so i’m going to make a new layer and make a sketch on top of that. this sketch won’t form part of the final .bmp so it doesn’t really matter what the layer is called but i’m going to not be lazy and call it ‘sketch’. the colours also do not matter here!
remember a ‘full’ texture like this is going to tile so it needs to be seamless. to check this with my 64x64 texture, i can make a new 128x128 canvas and copy and paste my sketch over 4 times and move them to each corner to make sure the edges line up.
once you’re happy with your sketch, save it! i am saving it with the file extension .sai2, as this supports layers. i recommend saving a .sai2 (or .psd, or any layer-supporting file format) alongside your eventual .bmp, as this will preserve the layer information so you can easily open it again and edit it, or swap palettes

a note - i am pixelling this texture completely from scratch, but nothing is stopping you from finding a texture/image you like on the internet and using that. copy/paste it onto a layer, set the opacity to 50% or so, and pixel over it. the important part is really just making sure each colour is on a separate layer.
after my sketch is done and dusted, i can start getting the colours on. each colour i eyedrop from the palette of my choice, in this case, twilight-sun-up. i like to expand the canvas of the palette so i can put down blobs and colour numbers of my chosen colours next to it, like a palette inside a palette - it helps me see if the colours i’m picking work together/have the right hue, saturation, lightness, etc etc. not a compulsory step!
A NOTE ON THE ERASER TOOL - sai’s is shit for pixel work. it essentially just reduces the opacity bit by bit rather than properly erases the pixel. using the eraser tool will most likely result in extra colour values that are not within your palette which we do not want! so instead of using it, if i can’t just undo the pixel(s) with a cheeky ctrl+z, i use the square select tool to select the pixel, and then the move tool to just move it under where i’ve already placed a pixel on that layer, essentially hiding it or ‘erasing’ it. you can also select the pixel and go absolutely ham with the eraser tool over it, as the eraser tool will only work in that selected area. go ham though - make sure any stray pixels are obliterated!
these are the tools i mentioned above for faux erasing/error correction! pretty self explanatory but the square is select and the arrow thing is move. you'll find these on the toolbar below your colour wheel and above your brushes
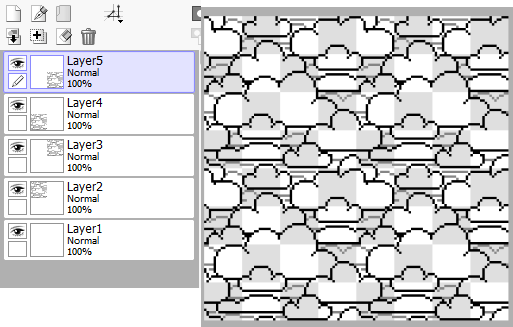
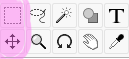
here’s a look at how i’m building up the layers (60 is incorrectly labelled - it is in fact 69. i fix this later lmao)

and here’s my finished texture, as i want it to appear in game. look at all of those layers! some of the colours are used on multiple layers where i wanted to go back in and add more of that colour on top. this is fine, as long as all layers only have one colour value on them, and are labelled with the correct colour number, all is good!
save it when you're happy! i also like to save a .png copy at this point so i have a reference for what the texture is supposed to look like. i also fill the background layer in with a contrasting colour so i can make sure i haven’t left any gaps - i had one gap in this texture up near the top, so i went back in and filled it in, picking which colour i wanted it to be and making sure i filled it in on that colour’s layer.
now for the part that makes it ugly. delete, or make invisible (using the eye button next to that layer) your sketch and background. we don’t need those, or to change them anymore.
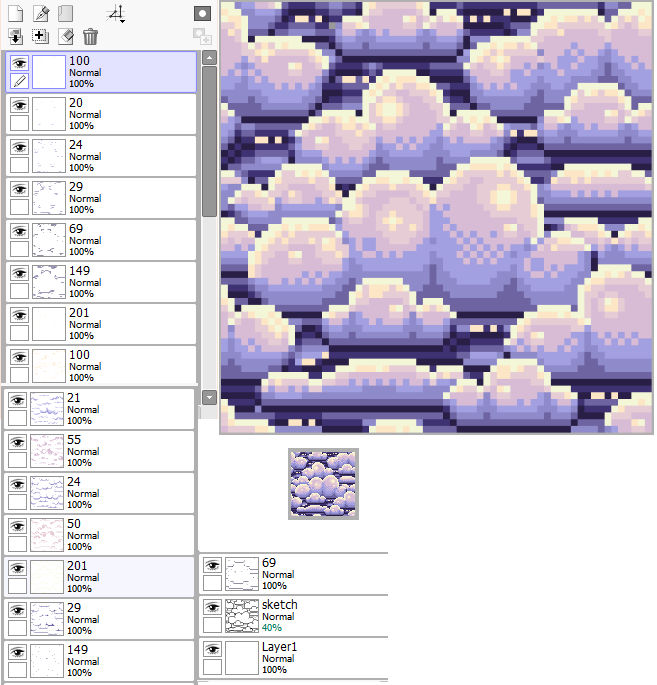
one by one, i’m going to go into each layer and change the colour to the one with the same index number that is on the petz palette. so, for my layer called 69, i’ll eyedrop the colour 69 from the petz palette (it’s in the dark orange ramp), click the ‘lock opacity’ button with that layer selected (a little lock icon will appear on that layer!), whack my binary pen to size 100, and scribble all over. this will change what was the darkest blue (69) on my texture, to the dark orange that is petz 69.
for every layer i am going to do this - basically swapping each colour out for its petz palette equivalent. i work up the layers, locking them one by one, just so i can keep track of where i am.
here is our new, petzified texture! i have saved this as a .bmp. remember to keep saving your sai2 file as well to preserve all of the layer information.
looks unsavoury.
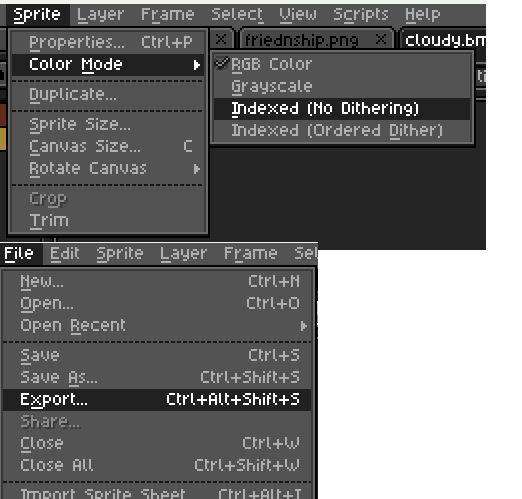
now this next step, i have no clue if it actually does anything, but i do it for peace of mind. i load the unsavoury petz version of the .bmp into libresprite, change the colour mode to ‘indexed (no dithering)’ then re-export it as a .bmp. i usually let it overwrite the .bmp i saved from sai.
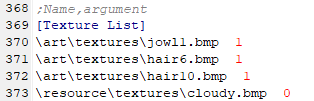
now to test it in game! see here again for hash’s tutorial on how to load palettes into petz. for my example i am going to use a great dane. load her up and in! i set it to argument 0 as i want it to appear as-is, with no transparent parts. i find that textures can look different depending on the colour of the ball underneath, even when they’re not transparent atall like ours, so it’s a good rule of thumb to make sure all the balls with our texture on are the same colour. lighter colours tend to work best, so i’m going with 15. my texture list looks like this; you can load the file up in PWS after and getting slapping down the colours and textures etc.
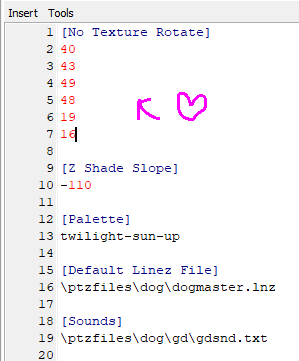
now for something i always like to do for textures like this, but is optional, is to add a section in LNZ for ‘Z Shade Slope’ like so:

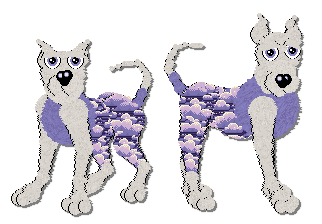
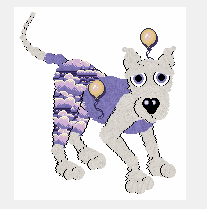
this essentially disables the shader on the pet, so the texture remains -as is- and doesn’t end up with petz weirdly shading it. here’s a side by side of a dog with [Z Shade Slope] set to -110, and a dog without:
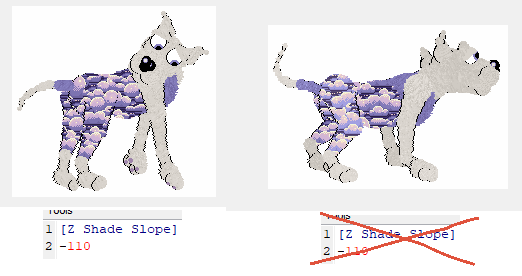
both of these are actually passable, but it varies from texture-to-texture (for example, my mermaid scales on the dog in the header looked Not Good without Z Shade Slope -110). on a whole though, i often find that petz shaders flatten the texture (you can see how flat the light blue shade is on the knee on the dog on the right!) but it’s up to you to decide which you prefer! i will carry on using the dog on the left with the Z Shade Slope -110 on/used.
another optional section is [No Texture Rotate] - you just slam this in LNZ and add the ball numbers underneath on separate rows for the balls where you don’t want the texture to rotate. for the example i’ll add all of the ball numbers on which i’ve plopped the texture on, but if you’re using your texture on paintballs, you’ll probably want to add the ball numbers that those paintballs are on, too.
here’s a side by side of a dog with [No Texture Rotate] applied to our textured balls, and one without. once again it’s a matter of personal preference - ‘no texture rotate’ just keeps everything in place, which i like, and makes the texture less ‘unpredictable’ and more uniform.

and here is the finished result! my texture with both the optional sections above (Z Shade Slope and No Texture Rotate) added into the file. i also add these sections into the puppy part of the LNZ… once again for peace of mind, i don’t know if you have to do that.
the beauty of this aswell is that you still have the file (in my case, .sai2) saved with all of the layer information preserved. so say if i want this texture for use on a different palette now, all i need to do is recolour it how i want in this different palette, following the steps earlier for locking the layer opacity and recolouring the layers individually, but this time also changing the name of the layer to the number of the colour used off the new palette. then once everything is fully recoloured and renamed, it can be recoloured back into the petz palette and saved as a .bmp/indexed as done above.
part two - transparent textures
first of all, take this magenta. neocities won't let me upload it for free because it's a bitmap, so google drive it is. this is the ~magic petz magenta~ that now works as a transparent background thanks to prism’s petza. think of it like a normal transparent background, petz bitmap style.
i’m going to be working similarly as i did above; creating my texture/’tattoo’ in the twilight-sun-up palette, and then changing the colours to match the indexes of the petz palette.
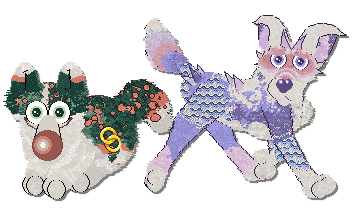
size becomes something that requires more thought with transparent textures, in particular ones that will look like tattoos, like the one i’m about to make (like the wedding rings on the honker in the header), versus ones that are intended to repeat like a pattern (like the petals and flowers on the honker in the header). i find 64x64 once again, to be perfect for a tattoo that’s going to sit on a paintball on a normal-sized pet. if you want to make a fuckoff massive wing or have tolstoy’s war and peace appended to your petz ass, size accordingly. but two things remain the same:
- make sure the texture either is 8x8, 16x16, 32x32, 64x64, 128x128, 256x256 etc., doubling each time. i do not know if anything bigger than 256x256 has been made and used so proceed with caution.
- make sure there is a fair amount of blank (magenta, transparent) space around your tattoo so that it doesn’t tile. if your design is too close to the edges, it’s gonna tile or be partially cut-off, neither is what we want. if you’re making a pattern rather than a tattoo this doesn’t really matter.
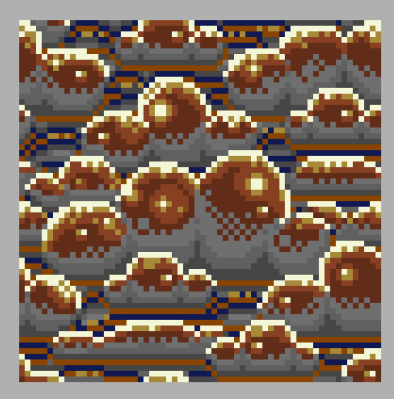
i’m going to make a balloon cause it kind of matches the cloud/sky theme. left is what i want it to look like in game, right is it in the petz palette.


now i load it into LNZ. the argument for transparent textures is always 0! you will also want to add the dimensions of your texture to it’s line in the texture list too - this is so it centres itself correctly. my texture is 64x64, so i need to add 64 64. the result should look something like:
(yourtexturepathandnamehere).bmp 0 64 64
i’m going to start by demonstrating a transparent texture on a paintball, on the dog’s belly ball. the magenta will be gone, and the belly ball, and any texture or other paintballs on it, will be visible underneath. it’s just a normal textured paintball, really, and will layer like paintballs usually do.
remember [No Texture Rotate] from earlier? if it isn’t already a section in the breedfile, add it, and add whatever ball you are putting the paintball on to that list. same goes if you apply the texture direct to a whole ball or addball - add that ball’s number to No Texture Rotate. otherwise they move around and won’t always appear as you want them to. furthermore, whatever you are texturing with your transparent texture, whether it be a full ball or paintball, it still needs to be a colour within petz’ texturable range - that is, from 10-149.
all the relevant sections are smooshed together in the image below:
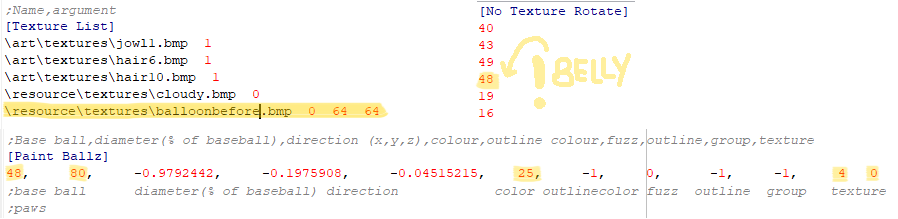
highlighted from left to right in the paintballs section are:
- ball number (make sure this number is in [No Texture Rotate])
- paintball size (depending on how your texture looks on the paintball, you will likely have to tweak this! usually to make it bigger so the whole tattoo/texture shows)
- paintball colour (i’ve used 25, a texturable colour)
- texture number (remember the first texture in the texture list is 0! so my balloon texture has texture number 4)
- finally a 0, to anchor (always important)
now let’s have a look at this in game.
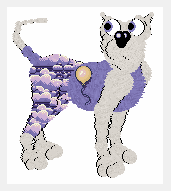
not bad! position and size can be tweaked as much as you like.
adding a transparent texture to balls is very much the same, but i’ll demonstrate it below. there’s a lot more trial and error with regards to placement, but the fundamentals are the same! here’s the LNZ for me looking to plonk the balloon on the dog’s head via an add ball
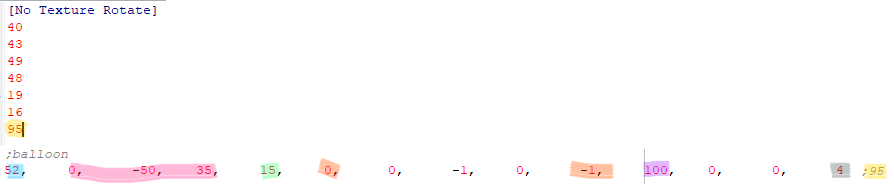
- in blue is our add ball’s base ball. the add ball will follow the movement of the ball it is based off. i’ve used 52, the head ball, as the balloon will be sitting on his head.
- in yellow is the add ball that i want to balloon to lay on. i’ve added a tag to the end as i try and number my add balls, in this case, this ball is number 95. i have also added 95 to the [No Texture Rotate] list
- in pink are the coordinates. you’ll want to use these to move the ball around to get it in the right position. the first is the x coordinate and moves the ball left and right, the second is the y coordinate which moves the ball up and down, and the third is the z coordinate, which moves the ball forwards and backwards.
- in green is your ball colour, once again this needs to be in the petz texturable range of 10-149
- in orange are ‘outline colour’ and ‘outline type’ respectively. i’m not sure if transparent textures work with outlines, but you probably don’t want a floating outline anyway. so these can stay as 0 and -1 respectively.
- in purple is the ball size, another section you’ll likely want to use to trial and error getting the balloon in the right place
- and in grey is the texture! texture 4 again, as my texture list is unchanged from the paintball demonstration above.
now in game:
a floating balloon! i would reposition it, but for tutorial purposes, it is fine.
aaaand.... that’s all there really is to it! if sending a tatted and tex’ed up pet to someone, you will need to send along the .bmps, as well as make sure that the recipient has prism’s latest BETA RELEASE petza.
part three - 13.08.25 update, indexing correctly!
THE ISSUE: 'indexing' as i described above lead to textures not showing up correctly in game, as they are not indexed TO the petz palette. petz, as it seems, will find near matches to colours when textures are not indexed in it's palette, which doesn't always lead to desirable results, and can really cause chaos when it comes to transparent textures as that bright pink colour needs to be index 253, not just bright pink. this edit heavily relies on libresprite and it's palette feature!
if i want to still make a texture in sai, there's a fiddly way to index it properly. below is a texture i have made in the 'papercrane' palette in the colours i want it to appear in game. i still have all of the different colours set up on different layers, with layer names pertaining to their index numbers.

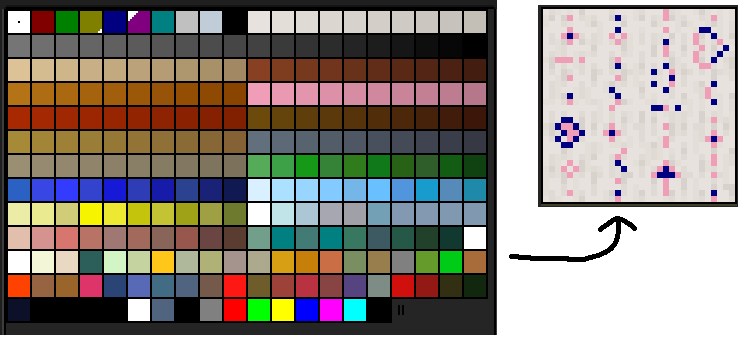
now, with the file still open in sai in the background, i can load this into libresprite. as you can see in the palette section on the left, only a few colours appear. not good! we need this in the petz palette. so to do that, i click the little three lines button where you'll find 'load palette' and 'load default palette'. i have petz.bmp set to my default palette, but you can also locate it in your own folders with load palette.
once loaded, the colours on your texture will change, this is fine! now referring back to the sai layers and their index numbers, i go over and recolour every pixel/colour into the index/colour it should be in the petz palette. the result is below on the right - i now have a texture that is ready to go, correctly indexed, and should appear as i want it to in game when i use it alongside the 'papercrane' palette on a pet.
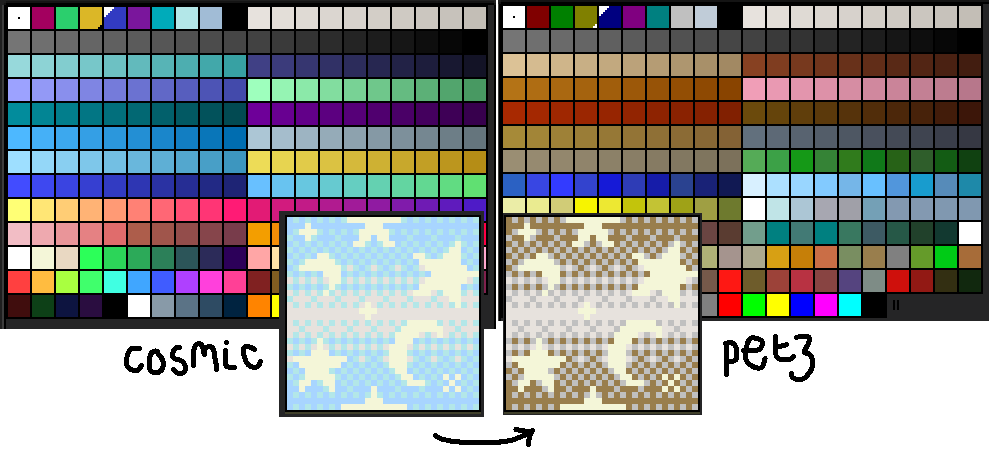
honesty - i don't make textures like this much. it's time consuming and fiddly, recolouring it by hand. my favourite way to make textures now is just solely in libresprite. you can load any palette up into libresprite, doodle up what you want, and then swap it to the petz palette by loading that up instead. this seamlessly keeps the colours correctly indexed so they will show up as you intend them to in game. below is a modified dithered wizard texture that i drew up in the cosmic palette, and on the right is what it looks like when i load up the petz palette. the version on the right in the petz palette is the one that gets saved, and this will mean that the texture is indexed correctly and will show up as you want it to in game!
TROUBLESHOOTING
transparency for petz is still in beta. if you are having issues, i recommend running through this checklist
- make 100% you have the latest beta release of prism’s petza! prism's discord, latest beta thread, most recent post from prism with a petza.toy file attached

- make sure you have the boxes ticked for ‘enable palette swaps’, ‘unlock palette’ and ‘enable transparency in petza settings
- make sure you have added the dimensions of your transparent .bmp in the texture list otherwise it will likely just look like it’s not there atall. the texture list entry should follow this format
texturerootandname.bmp 0 number number
where number is your .bmp’s dimensions
- make sure everything is correct in the LNZ just, generally, for adding a normal texture. i often make typos when loading in textures! make sure that balls and paintballs have the right texture numbers.
- i have come across an issue where a transparent texture that worked in my game lost it’s transparency when it was used in other people’s games - the tattoo, instead of showing up on a transparent background, showed up on a Flat Poo-coloured background. Nena found that re-indexing the textures made it show up normally again. the big magenta box above SHOULD be the right petz transparent magenta, but if you stumble across this problem it’s worth running the texture through libresprite, setting it to indexed colour mode, and exporting it again, and/or loading it up in your art software and refilling the background with the magenta.
- failing that, there’s myself and many other community members in petz life that are more than happy to help troubleshoot your issue! so drop a message and hopefully (and most likely) people will be able to help!
thanks to!
- prism for the modified petza and the ability to do any of this in the first place
- queenie for compiling and maintaining the palette masterlist
- hash for the palette swapping guide (and for letting me know that petz does transparency now)
- nena for saving my wedding honkers by fixing an issue with my textures
- helen for informing me that i do not have to frankenstein all of my transparent textures to make them show up correctly
- the general petz life community for being the best and providing me with all the information and resources to be able to make this tutorial in the first place!
you can grab the two textures i made for this tutorial here if you so wish! i have also included the .sai2 files in the zip for you to recolour them as you wish. remember in their current state, they are made to work and show up 'correctly' with jem's twilight-sun-up palette.

thank you for reading, and i hope this tutorial has been useful to you in some way!
go back to perfume